Path to excellence

I would like to thank Curtis of Kendo USA for allowing us to quote his article (original).

================================

In kendo there is an old maxim that states 1,000 practices to temper and 10,000 practices to polish. Research has shown that to become an expert requires 10,000 hours of practice. So let’s look at the numbers to get there.

In general we practice 45 weeks per year. So if by some miracle you attend all these practices we have a baseline to go by.

In order to temper our kendo (we will forego the “expert” 7-dan/8-dan calculations):

Times per week # of practices
per year
1,000 practices
1 45 22.2 years
1.5 67.5 14.8 years
2 90 11.1 years
2.5 112.5 8.9 years
3 135 7.4 years
4 180 5.6 years
5 225 4.4 years
6 270 3.7 years

================================

Whether the “10.000 hours rule is true or not, it does provide at least an interesting take on what it takes to master something. Curtis’ quick calculations show something that most of us already know: if you want to become anywhere near decent at kendo, you will need lots of practice! Our dojo holds three classes each week, but many of our members only visit one of those. This would suggest that you would need at least twenty-two years to gain any basic proficiency!

At the beginning of this season, Bert Heeren-sensei wrote a letter to all students. In this letter he calls upon all students to take kendo seriously, as budō instead of a sport or hobby. If you want to make any noticeable progress you will need at least two classes each week, preferably three. And the great thing is: your membership contribution has already paid for three sessions each week! All you have to do is show up and to give it your best! And don’t discount those suburi which can be done at home.

So! Almere, take a dare and get ready for some heavy training in Amstelveen on tuesday or saturday! And Amstelveen, won’t you make the trek to Almere for extra kata training and to meet some fresh faces?

Studying kata

The time has come to prepare for the 2012 NKR shinsa (kendo exams). As we already mentioned, the exam consists of four parts:

  • Kirikaeshi
  • Jitsugi
  • Kata
  • Gakka (written test)

Many things have already been said about kirikaeshi and jitsugi, so let’s spend a little more time preparing for the kata exam!

Background

In his 2012 book “Kendo Coaching: tips and drills”, George McCall writes on the subject of kata:

If we look at the word KATA in Japanese, its usually rendered as 形. However, the actual proper usage is 型. Both read the same, but what’s the difference? The former simply means “shape” or “form.” It describes the form that something is in, what it looks like. The second kanji, on the other hand, is the thing that is used to create items of the same shape, in other words, a cookie cutter like device. 

Kendo-no-kata can therefore be thought of as a kendo shaped cookie cutter and the students who practice it cookies (hopefully kendo shaped). Although non-Japanese readers might not be interested in the difference, I think that one of the main purposes of kata study is revealed: i.e. kata training was/is traditionally thought of as one of the main vehicles to teach people correct kendo.

Kendo kata help us study proper posture, maai as well as seme. By practicing sword fighting in a simulated and choreographed fashion we can focus completely on the intricacies of our body, of our movements and of the connection with our opponent. We also learn to judge distance, which helps us in our kendo.

Also, while kendo is an abstraction of true sword fighting, the kendo kata approach “real” fighting closer. Both the techniques used, as well as our bokken help us understand the more serious side of our art which entails life or death situations. They’re no kenjutsu of course, but the kata are absolutely a useful tool in understanding and learning kendo.

Some suggest there is also a spiritual side to kendo kata. In Inoue-sensei’s “Kendo Kata: essence and application” it is said that kata #1 through #3 show the progression of a kenshi in his studies. While at first he will win a fight by outright killing his opponent, he will then move on to win by only dismembering. Finally the kenshi will grow so far that he does not have to strike at all, winning by pure seme (kata #3). The UK kendo foundation has some further reading on this subject.

Preparation

Students first learning about kendo kata are advised to first observe a number of videos. The web is rife with kata videos, so we’ve taken the time to choose a number of good ones.

First up, there is a series of classic AJKF training videos (in Japanese). They are a bit dated, but they go over each kata in exquisite detail by filming from various angles and by zooming in on important parts. They also show examples of what not to do. Below are the first four kata, the other videos can be found under the YouTube account that posted these videos.

Another excellent video was made by Kendo World at the 2012 keiko-kai. While it only shows each kata once or twice, the demonstration is still very impressive.

Advanced reading

Should you be inclined to deeply study each kata in written form, then we heartily recommend Stephen Quinlan’s “Nihon Kendo no Kata & Kihon Bokuto Waza”. In this excellent and thorough document (free PDF) mr Quinlan analyzes each kata, which is accompanied by many photographs.

Preparing for shinsa

In less than two weeks time the NKR will host its semi-annual kendo grading exams, at the November centrally training. A number of our Renshinjuku students will take part in these examinations in order to test their current level. For many of them, this will be their first grading outside our own dojo, so we would like to take this opportunity to provide some information on the subject.

According to the NKR website, the requirements for kendo examinations are as follows:

  • Kirikaeshi
  • Jitsugi
  • Kata
  • Gakka

The kata requirements differ per level. Ikkyu aspirants need to demonstrate kata #1through #3, shodan will show #1 through #5, nidan goes up to #7 and anything above nidan will display all ten kata. Aside from above requirements, there are also some formalities to clear, such as minimum age and a few payments.

For the purpose of this document I will limit myself to the ikkyu grading as I have no experience at all with the higher levels.

Before the grading, or shinsa, even begins there is the matter of proper presentation. If a shiai (tournament) would be compared to a business meeting, then a shinsa would compare to a gala: at the prior you are expected to dress and behave well, at the latter you are to act your very best! Apply proper personal care (nails clipped, hair properly kept, shaven if applicable) and make sure your equipment looks the part (proper maintenance, no loose ends, repairs where needed). Remove all dojo markings from your uniform and also remove your zekken. Make sure you wear your uniform and bogu neatly: no creases in the back, all himo at the same length, all himo lying flat, etc.

In kirikaeshi remember that it’s not a test of speed, but a test of skill. Show your best kirikaeshi by not rushing through it, but by paying attention to all details: footwork, timing, upswing through the center, downswing at an angle. Strike men at the proper angle and height. You are trying to strike ippon every time. As Heeren-sensei has pointed out repeatedly, your kirikaeshi should be performed in one kiai and breath.

Fighting in jitsugi should not be compared go shiai kendo, but instead is more alike to the jigeiko we do in class: it is not a fight for points. Instead, it is a fight to show and test skill. Do not be preoccupied with scoring points and with defending against your opponent. Focus on ensuring that the both of you show your best and high quality kendo. Show a
connection between yourself and your opponent, show proper seme, show zanshin and show an understanding of your opponent’s actions.

The kata examination should show a similar connection with your opponent. Kata are not a simple choreography, kata are a study in forms of a proper sword fight. If possible, take it even more seriously than jitsugi or jigeiko as the bokken represents a real blade. Make sure that you have memorized the forms beforehand, then lock eyes with your kata partner and commence the “dialogue” that each exercise is.

In all of the above examinations kiai is key. I was once told that “in the early stages of kendo, >95% of kendo is kiai“. Whether that is really true is another thing, but the essence of the matter is that kiai is important. It regulates your breathing, it vocalizes your intent and assertiveness, it impresses your opponent and it is part of yuko datotsu. Without kiai there is no spirit, without spirit there is no kendo only stick fighting.

At this level, the gakka (written exam) focuses on basic knowledge of kendo. Terminology, equipment knowledge, basic concepts as well as rules and safety are topics you may expect to find on the test. In preparation ensure that you are familiar with most of the terms in our dojo’s lexicon. The AUSKF also has an excellent gakka study guide, listing some of the common topics that you can be questioned on, including suggestions on what to study.

If you have questions about the upcoming shinsa, please feel free to ask your teachers. If you feel that you need feedback on your kendo in the next few weeks, please indicate this to your teacher.

Lexicon: seiretsu and dojo

For many of our new members, all the Japanese terms used in class can be confusing. From my own experience I know it’s taken me months to get to know most of the common terms. Of course students can find help in the glossary compiled by our teachers, but at times a bit of extra explanation may be helpful.

We continue our series of explanatory articles with commands from the line-up. We will also provide an explanation of dojo layout.

As noisy and violent kendo class may be, there are two moments that form a stark contrast: at the beginning and end of class all students line up to thank their classmates and teachers and to meditate. The dojo is plunged into quiet, while students prepare their armor and ready themselves. Usually it’s the highest ranking student (not the sensei themselves) who call out the following commands.

  • Seiretsu (整列) Literally, “form a line“. While the sensei are seated on their side of the room, the students line up according to their rank (see explanation about dojo layout). Everyone holds their shinai in their left hand, hanging gently downwards. Those who have armor, wear their tare and dou, while holding their men under their right arm (with kote and tenugui inside the helmet). In our case, the lowest ranking students sit on the left and the highest ranking students at the right. Visitors will always be on the right-hand side of their rank group. Sometimes we change the order a little bit, by lining up based on age.
  • Seiza (静坐) There are two distinct and applicable ways of writing “seiza“: 静坐 “to sit peacefully“, or 正座 “to sit kneeling“. If you are not yet sure how to properly sit down into seiza, Kendo World made a great video about seiza. When seated, the kendoka place their shinai on the floor (lying on the tsuru). Those with men take the kote from the men and place them on the floor. The men is then balanced on top, with the tenugui draped over it neatly.
  • Shisei wo tadashite (姿勢を正して) Literally, “straighten yourselves“. While seated, you are to sit upright and with a straight back. Do not slouch, do not fiddle with your uniform, just pay attention and sit up straight.
  • Ki wo tsuke (気を付け) A call to “stand to attention“, similar to “shisei wo tadashite“. Again, it means you should focus and pay close attention to the proceedings.
  • Mokuso (黙想) The word mokuso refers to meditation in general. While there are many kinds of meditation, in our case we know two kinds: EITHER try to empty your mind completely (mushin), OR focus your thoughts on today’s lesson or on specific points of improvement. Don’t close your eyes completely, cup your hands in your lap and think about what you need to learn. For more details on mokuso, watch this great Kendo World clip.
  • Mokuso yame (黙想辞め) As in all commands issued in class, yame means “to stop”. It is the call to stop meditation, to bring your attention back to class and to be prepared.
  • Rei (礼) Literally means “to express gratitude“, so while the word rei is used as a command to bow it is actually a request to show thanks.
  • Shomen ni rei (正面に礼) Not used in our dojo, but included for completion’s sake. “Bow to the front“, which includes the “highest” seat in the room (see below). One could say that you are bowing to the dojo itself and to the spirit of budo, to thank for the lessons learned and the protection provided inside the dojo. You also bow to shomen when entering and leaving the dojo.
  • Shinzen ni rei (神前に礼) Not used in our dojo, but included for completion’s sake. A call to “bow to the altar“, which is usually only used if the dojo has a kamidana (see below) and if the dojo is non-secular. One bows to thank the ancestors, sensei from the past and possibly a deity.
  • Sensei ni rei (先生に礼) Literally “thank your teacher“.
  • Sensei gata ni rei (先生方に礼) Literally “thank your teachers“, with “gata” being the honorific for a group of people.
  • Otagai ni rei (御互いに礼) Literally “thank each other“. You thank your classmates for practicing together and for learning from each other.
  • Sougo ni rei (相互に礼) Literally “Show mutual thanks”, quite the same as the previous command.
  • Men wo tsuke (面を着け) “Put on your mask“, the command to don your tenugui, helmet and gloves.
  • Men wo tore (面を取れ) “Remove your masks“, the command to take off your protection (except dou and tare). In September Heeren-sensei explained how to properly take off your helmet, showing enough respect (at the bottom of this summary).

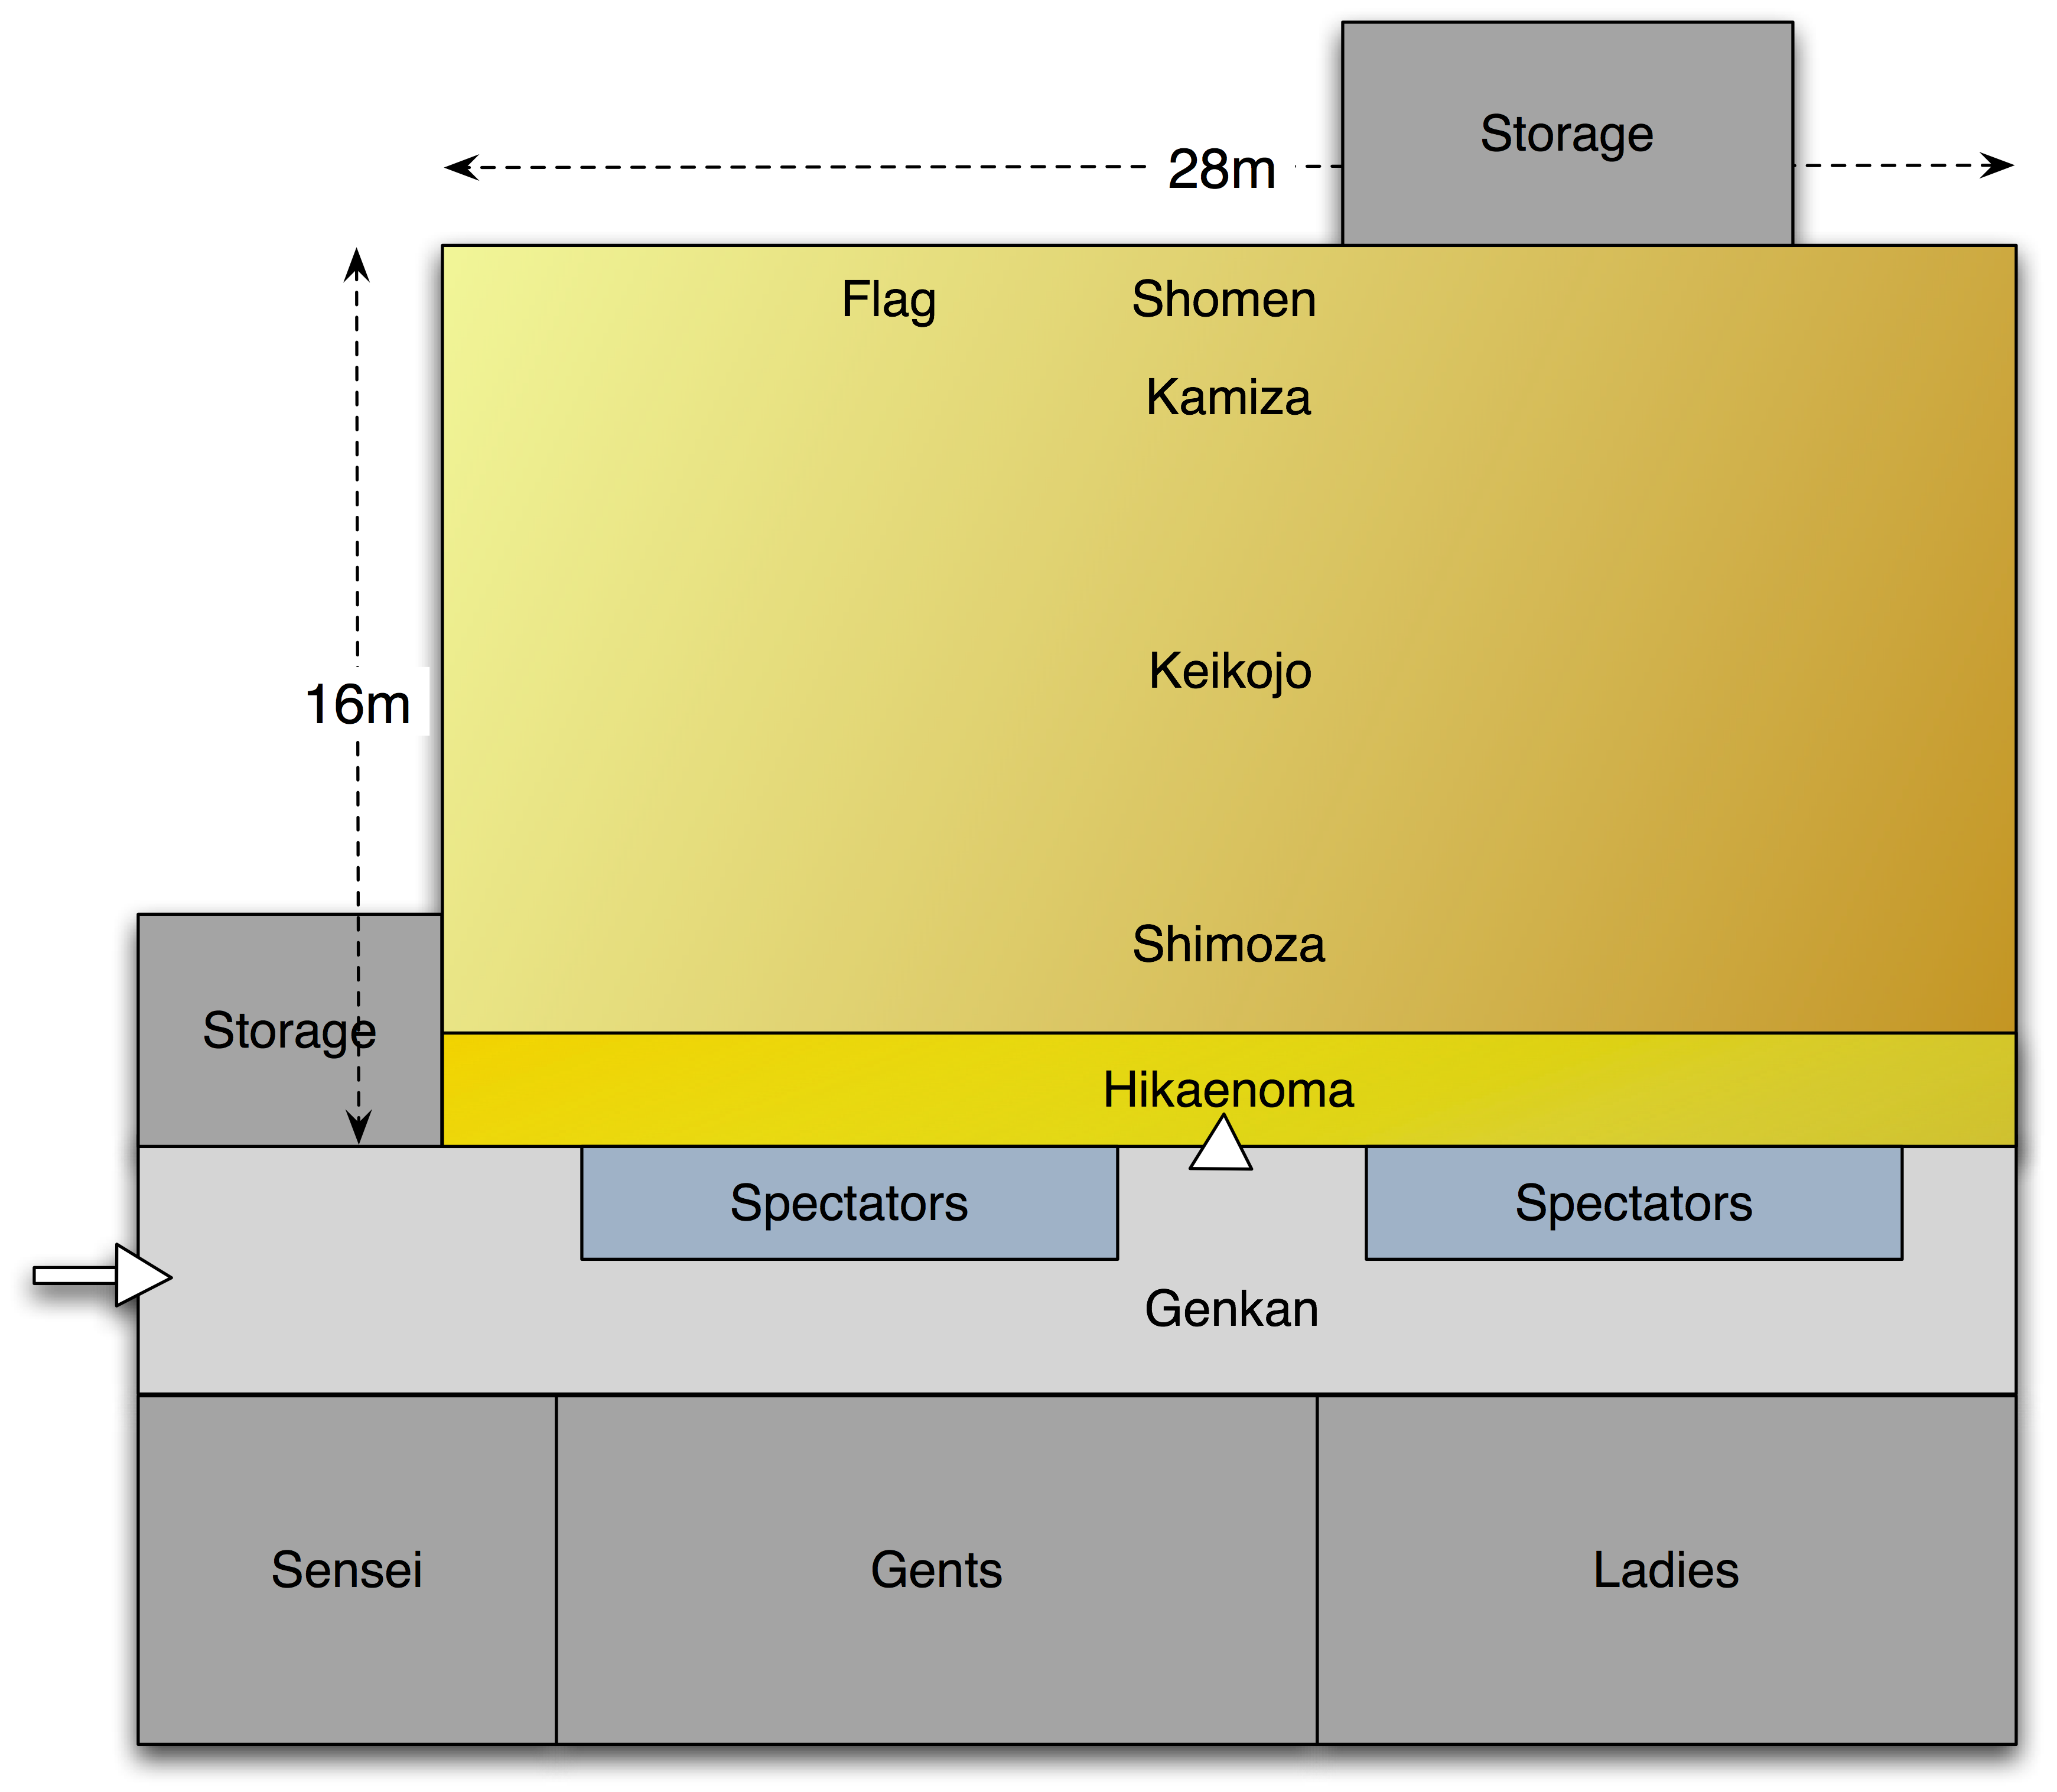
The preceding paragraphs have already mentioned a lot of terms describing parts of the dojo. Below is a drawing of the Amstelveen dojo, with the most important terms shown in the right location. Both the drawing and the lexicon below could only have been made because of Dillon Lin’s excellent article on dojo layout.

The following list is ordered from the entrance, towards the highest and most important position in the room.
  • Genkan (玄関) The entrance foyer, leading to the dressing rooms. Officially the term genkan is reserved for a foyer where one takes off ones shoes, but apparently it’s not incorrect to apply it to the tiled section of the gymnasium we train in.
  • Hikaenoma (控えの間) The perimeter of the dojo nearest to the entrance is used as temporary storage space. Shinai are put down here when not used and the kendoka place their men and kote here before class. Kendoka who need to quickly drop out from an exercise (for example to fix their armor) will also sit down in the hikaenoma.
  • Shimoza (下座) Consisting of the kanji for “bottom” and “sit”, this is the junior side of the dojo. All students line up here, according to their rank.
  • Shimoseki (下関) This is literally the lowest seat in the dojo, at the far left of the shimoza.
  • Keikojo, or embujo (稽古場, or 演武場) Literally, “training place“. The center of the dojo is used for training.
  • Kamiza (上座) Consisting of the kanji for “top” and “sit”, this is the senior side of the dojo. The teachers in charge of class will sit on this side.
  • Joseki (上席) The “highest seat” in the room, which you could say is the VIP seat. In our case, this is on the right-hand side of the kamiza (in the picture that is). This seating is reserved for visiting sensei, high-placed visitors and officials, who are to observe class.
  • Shomen (正面) The “front” of the dojo, the wall along which the kamiza is aligned. We bow towards shomen when entering and leaving the dojo.
A few other elements often seen in dojo, but not ours are:
  • Kamidana (神棚) In Japan’s religion Shinto, the kamidana is a small shrine or altar kept inside the household, office, dojo or various other places. A kamidana consists of many objects, all of which are very well described by the aforementioned Dillon Lin in this article about budojo no kamidana.
  • Tokonoma (床の間) In Japan many rooms have a niche in the wall, containing a piece of calligraphy, a work of art or an ikebana arrangement.

Our Amstelveen dojo may have neither of these two, but one could argue that the flag replaces the kamidana. Our flag is there to remind us of the dojo motto and to act as a reminder of the required frame of mind.

As always, I would like to thank Zicarlo for reviewing this article.

Lexicon: warmup & suburi

For many of our new members, all the Japanese terms used in class can be confusing. From my own experience I know it’s taken me months to get to know most of the common terms. Of course students can find help in the glossary compiled by our teachers, but at times a bit of extra explanation may be helpful.

We continue our series of explanatory articles with words and phrases from warming up.

We will start with a list of common stretching positions, which you will hear every week when training in Amstelveen as large parts of class are conducted in Japanese. Funnily enough, in Japanese “stretching” is a loanword from english: ストレッチ (su-to-re-chi).

  • Koutai (交替) “Alternate”, “switch”, or “change”, this word is used in class to indicate you need to switch between left or right in stretching. You will also hear it in mawari geiko, when it’s time to move to another partner.
  • Te or tekubi (手首) Your hands and wrists.
  • Ashi (脚) Your feet. Make sure to loosen your ankles and toes.
  • Hiza (膝) Your knees. Bend your knees and make rotating movements, flexing and stretching your knees.
  • Suwaru (座る) Squat, by sitting in a crouching position.
  • Mae ni kagamu (前に屈む) Bow deeply touching the ground. First with feet together, then wide-legged.
  • Ushiro ni kagamu (後ろに屈む) Bend backwards.
  • Koshi wo mawasu (腰を回す) Make circles with your hips, like a hoolahoop.
  • Akiresu ken (アキレス腱) The Achilles’ tendon, at the back of your foot. Step forward and sink a bit through your knee while keeping the back leg straight. Goal is to stretch the tendons on the rear leg.
  • Shinkyaku (伸脚) Stretch your inner leg, by crouching down and putting one outstretched leg to the side.
  • Shinkyaku fukaku (伸脚 深く) Stretch your inner leg, by crouching down and putting one outstretched leg to the side and pointing your toes upwards.
  • Yoko ni nobasu (横に伸ばす) Bend sideways, with one or both arms above your head.
  • Ookiku mawasu (大きく回す) Make large circles using your upper body, by bowing front-side-back-side-front in a fluid motion.
  • Ude (腕) Your arms. Stretch arm and shoulder by holding one arm across your chest using the other.
  • Ude ushiro (腕 後ろ) Your arms again, this time stretch the shoulder by putting your arm behind your neck and pushing backwards gently.
  • Ue ni nobasu (上に伸ばす) Stretch your body’s full length, by stretching your arms over your head and standing on your toes.
  • Ude wo mawasu (腕を回す) Turn your arms in circles, to the side of your body.
  • Kubi mae ushiro (首前後ろ), or unazuki (頷き) Nod your head up and down
  • Sayuu (左右), or kubiwofuru (首を振る) Shake your head from side to side.
  • Yoko (横) Tilt your head and bring your ear towards your shoulder.
  • Atama wo mawasu (頭を回す) Rotate your head gently, rolling it over your shoulders, neck and chest.
  • Janpu (ジャンプ) Jumping in place. We usually do jumping, followed by jumping jacks, followed by front-to-back jumping jacks and ending with squatted landings.

After stretching, we proceed to suburi (素振り), lit. “practice swing“, from 素 (plain, natural) and 振り (swing). You will often also hear this called “empty strikes” as we are performing strikes without hitting any target. There are many kinds of suburi, where the following are the ones most often performed in our dojo.

  • Jōge suburi or joge-buri (上下素振り) Large strikes, where the upswing reaches your back and the downswing stops at knee height. In Amstelveen it is taught that the upswing should touch your buttocks, as this will tell you whether your swing went straight through the center.
  • Shōmen suburi (正面素振り) Large strikes where the upswing reaches your back (see above) and the downswing stops at head height, as if striking men.
  • Zenshin kōtai shōmen suburi (前進後退正面素振り) Like shomen suburi, but stepping forwards and backwards with each strike. This is the actual shomen suburi performed at our dojo.
  • Sayū men suburi (左右面素振り) Like shomen suburi, but alternating strikes between the right and left side of the head. Sayu men suburi is often incorporated in what we call the “vierkantje“/square, or “kruisje/plusje“/cross exercise where you move forward,backward,right and left.
  • Haya suburi (速素振り) Literally “fast practice swing“, where you make small jumps or fast slides while striking at men height. Depending on the exercise, the upswing either reaches your back/buttocks (slow haya suburi), or the upswing stops in jodan no kamae (fast haya suburi).
  • Dou suburi(胴素振り) Practice swings where you aim for the torso, dou. We alternate between oki dou and chiisai dou.
  • Naname suburi (斜め素振り) Like joge buri, but alternating between right and left diagonal strikes.
  • Katate suburi (片手素振り) Literally “one handed practice swing”, where you perform any of the above mentioned exercises but with only one hand.
  • Shin kokyuu (深呼吸) Literally “deep breath”, where you step in and perform a large upswing while breathing in, then you breathe out during a slow downswing into sonkyo.
As part of the instructions for suburi you will often hear additional commands.
  • Kamae to (構えと) Stand in chudan no kamae.
  • Mae & ushiromae (前 & 後ろ前) Respectively forwards and backwards. You will hear these in exercises like the square/box or cross.
  • Hidari & migi (左 & 右) Respectively left and right. You will hear these in exercises that incorporate sayu men strike, like the aforementioned square/box/cross.
  • Ni-ju pon, san-ju pon, yon-ju pon etc. Literally “20 count”, “30 count”, “40 count”. Basically, the amount of suburi you are expected to do. It is suggested that you learn to count to at least 100 in Japanese.

With many thanks to Kiwa-sempai for providing the list of stretching commands and to Zicarlo for providing more help on kanji on missing terms.

Lexicon: keiko

For many of our new members, all the Japanese terms used in class can be confusing. From my own experience I know it’s taken me months to get to know most of the common terms. Of course students can find help in the glossary compiled by our teachers, but at times a bit of extra explanation may be helpful.

We’ll start off this series of lexicon posts with the types of keiko.

The word keiko itself means “practice”, “study” or “training” and consists of two kanji, 稽 (kei, to think/consider) 古 (ko, old). One could say that everything we do in the dojo is keiko.

  • Jigeiko (地稽古) Often called “free practice”, jigeiko allows you to practice any technique you would like. The kanji 地 has many different meanings, though in this case “real life” or “true nature” would be the closest meanings to apply. In jigeiko one does not think in terms of “winning”, it’s not a true fight. Instead, both kendoka work together to get the most out of the day’s practice.
  • Sogo renshu (総合練習) At Renshinjuku, sogo renshu is a type of jigeiko that is often suggested to students. Sogo (総合) stands for “integration”, or “putting together”. By practicing the techniques studied earlier in class you may attempt to integrate them into your own kendo.
  • Shiai geiko (試合稽古) A shiai (試合) is a match, a competition. Thus this type of geiko is meant to closely match shiai conditions: instead of practicing techniques, students attempt to win while at the same time not losing. This sets it apart from all other types of keiko, where you never worry about losing. In shiai geiko all normal competition rules apply.
  • Uchikomi geiko (打ち込み稽古) An exercise performed in pairs, motodachi will show openings for kakarite to attack. The goal is to improve both your technique, your footwork, sense of maai and your zanshin. Two readings of the kanji 打ち込み seem relevant: “put your heart into” and “invasion/drive into”. Regarded separately the uchi is conjugated of utsu (打つ, to strike/hit) and komi is conjugated of komu (込む, to go into). In a recent class, Heeren-sensei and Kiwa-sempaidemonstrated the use of seme techniques in uchikomi geiko.
  • Kakari geiko (懸かり稽古) While the kanji 懸かり have multiple readings, in this case “attack” would seem appropriate. Also, the verb kakaru (懸かる) can also be read as “to deal with”, which is apt as in kakari geiko it is your goal to break through your trainer’s defense. Sensei will not show openings, instead sensei will only allow strikes that are correct to connect and will fend off everything else. You must go all-out, while ensuring that your technique is correct. If your technique is sloppy, you will not be allowed to hit your partner.
  • Mitori geiko (見取り稽古) Believe it or not, but simply watching class from the sidelines has its own name. Do not be deceived! There is a difference between watching and observing, because by truly paying attention to your fellow students you can learn a lot! Also, the verb mitoru (見取る) means “to understand”.
  • Kata geiko (型稽古) The kanji 型 stands for a mold, e.g. something used to re-create in a standardized shape or form. In kata practice, we learn certain essentials of kendo by reproducing predetermined choreography. Each kata focuses on one or more important things to learn.
  • Mawari geiko (回り稽古) Mawari is literally “rotation” or “circulation”. Exercises performed with two people, for a set amount of time or strikes after which one rotates towards the next partner. This occurs in our dojo, when all students line up in two rows across from each other. After each short practice the lines move one position and you meet another partner.
  • Enjin geiko (円陣稽古) Everyone forms a circle (enjin) around one kendoka in the center. Either the center kendoka fights everybody in turn (often occurs on special occasions), or with every quick fight the winner stays in the center while the loser is sent away.
  • Moushiai geiko (申し合い稽古) A type of enjin geiko, where the winner picks the next person to practice with.

With many thanks to Zicarlo for advising on the additional meaning of various kanji.

The goal of kirikaeshi

At Renshinjuku we pay a lot of attention to Kiri Kaeshi. Some of our kendoka have undoubtedly experienced that Kiri Kaeshi is not just meant to tire them out, but that it has clear and tangible goals in improving your kendo.

I composed the following list of ten benefits of Kiri Kaeshi:

  1. Your techniques becomes faster and fiercer
  2. The power of your strikes increases
  3. Your physical condition will improve
  4. Movement of arms becomes more fluid
  5. Movement of the the body becomes lighter and you acquire souplesse
  6. Your handling of the sword becomes more efficient
  7. Balance in the body improves
  8. Your perception and sight become keener
  9. Your perception of depth (maai) improves
  10. Te no uchi becomes stronger

To begin further study of the various forms of Kiri Kaeshi I suggest the following YouTube video (shown below).

A higher level

Our mid-level team needs strengthening! By providing more attention to kendoka in bogu we can and should improve the kendo of our kenshi! We shall attain this goal by using traditional training methods, which come with a number of requirements. Among others it requires a guarantee of continuity.

Members are now expected to attend a minimum of three out of four trainings. If you cannot meet this minimum, it should be discussed with me, or with Ton Loyer-sensei. We’re putting responsibility for this discussion squarely with you, our kendoka! In the past few years we’ve seen Renshinjuku slip to become a sporting club and we must return to being a budo ‘club’!

Attendance in the dojo requires respect for our teachers. Tardy students will no longer be allowed to take part in training, unless otherwise indicated by a sensei. Members who are behind on membership dues will also not be allowed to take part in training. We will also take attendance, to keep track of who attends each training.

Renshinjuku is a kendo dojo where kendoka are offered the possibility to train and to develop their character. I would much rather do this with active members than with dormant members who only pay their dues. I believe that a small and enthusiastic group will achieve greater goals than a big and unmotivated one.

Yudansha will be given more attention this season. I have already prepared a training schedule.

Kendkoa, please think of your personal goals in kendo and let this shine through in your training! I have decided to intensify our training, by taking a hands-off approach to club organization and by taking active part in the fighting and training.

A number of organizational tasks are being delegated to members. You should keep a close eye on our website and our calendar to choose activities you want to take part in. It is your own responsibility and we will no longer keep on reminding you or great opportunities.

Anyway… I’m ready for the new season! My shinai have been sharpened and oiled. My hakama and keikogi have been laundered and ironed and my bogu has been polished. I’m looking forward to meeting you on the other side of my shinai!

GAMBATE!!!

Bert Heeren sensei

Renshi 6e dan kendo